
LED Cabinet Lighting Installation Guide
1

Determine Lighting Requirements.
Determine your lighting requirements including the location, number of LED lights needed, and the load requirements for the Power Supply (Driver) by performing a simple calculation*.
Plan how your lights will be run. If you want dimming capabilities, make sure the LED lights you purchase can be dimmed with a standard in-line dimmer, or if you need a Power Supply with dimming capabilities.
2
Determine Wire and Accessories.
Estimate the amount of wire needed, and determine the required wire size and capabilities. If LEDs are going Outdoors, you will need the correctly sized and jacketed outdoor wire. If indoors, a standard 18 AWG wire may suffice. Basic LED lighting will be a two-wire (Positive and Negative), while RGB will be a four-wire configuration (Red, Green, Blue, and Negative), and RGBW five wires (Red, Green, Blue, White, and Negative).
3
Check Local Building Codes & Standards.
Be sure to check electrical code requirements and regulations for your region, and consult or hire an electrical contractor if unsure, or if hard-wiring is necessary.
4
PLAN LED Locations and Wire Routing.
Carefully plan and mark your LED lighting locations, paying specific attention to cut-out sizes, depths, and wire routing.

*Calculation for number of LED Lights per Power Supply:
(WATTS X QTY = TTL WATTAGE) +10% = minimum required wattage of power supply
(ie: 12 x M1 Step Lights =12W, 6 x RD7 Cabinet Lights =12W. TOTAL Wattage: 12+12 =24W + 10% =26.4W minimum. MINIMUM 30W Power Supply is required.)

HOMERUN INstallation
LED 2-wire “Homerun” installation. Multiple LEDs with a wire lead that runs from each LED light engine back to the power supply. Add dimming capabilities with a dimmable power supply (driver).
Daisy Chain installation
To wire a series circuit like the one shown, the positive output from the driver connects to the positive of the first LED and from that LED a connection is made from the negative to the positive of the second LED and so on, until the last LED in the circuit. Finally, the last LED connection goes from the negative of the LED to the negative output of the constant current driver, creating a continuous loop or daisy chain. Add dimming capabilities with a dimmable power supply (driver).
Installing Cabinet Lighting

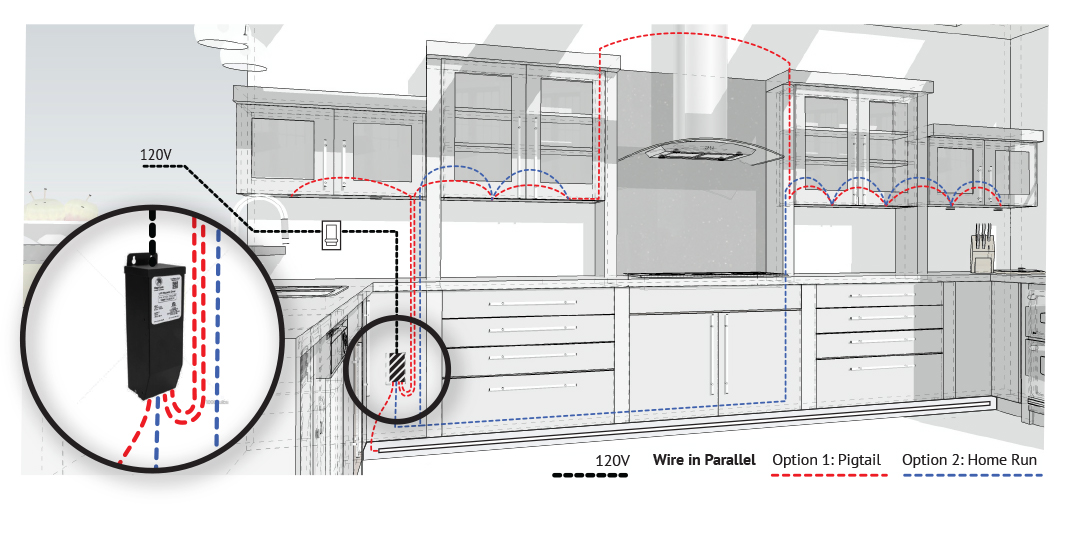
The diagram above shows the installation options available for wiring LEDs into cabinets. To provide dimming options, the dimming switch is wired between the 120V power lead and the dimmable driver (power supply).
Modular LED Linear Bar Under Cabinet Lighting: Plug-In Installations

The LL50 is the easiest most DIY friendly option for linear cabinet lighting. It is a simple component system of varied length linear bars that connect together and plug directly into an outlet. Corner and flexible connection options are available, and the light bars are held in place by a discreet bracket system.
Advantages
Easy for experienced DIYers to install – no electrical wiring necessary
A good choice for single-fixture applications
No new electrical access required
Drawbacks
Design constraints
Cords will be in view
Utilizes electrical outlets that might otherwise be free